
Rotate Joint
Overview
Rotate Joint is a command that allows you to rotate a selected assembly joint 180 degrees in your Inventor assembly by inverting its alignment. This is especially useful for flipping the orientation of parts or sub-assemblies connected by joints, such as duct fittings or mechanical linkages. The command automates the process of toggling the "Invert Alignment" option in the Inventor Edit Joint dialog, saving time and reducing manual errors.
If the selected component does not have any joints, the command does nothing. Rotating a joint may affect the orientation of connected components, and in some cases, may result in "Sick" joints if constraints are violated.
How It Works
- Prompts you to select a component in the assembly to expose its joints.
- Prompts you to select the joint to rotate.
- Inverts the alignment of the selected joint, rotating it 180 degrees.
- Connected components may also rotate depending on the joint configuration.
- If constraints are violated, "Sick" joints may appear.
Usage Instructions
- Open the assembly containing the joint you want to rotate.
- Activate the Rotate Joint command from the toolbar or menu.
- Select the component to expose its joints.
- Select the joint to rotate.
- The command will invert the alignment of the selected joint, rotating it 180 degrees.
- Review the assembly to confirm the joint and connected components have rotated as expected.
Trouble Shooting
- If the joint does not rotate, check if the component has any joints.
- "Sick" joints indicate that the rotation is blocked by constraints; review and adjust constraints as needed.
- Ensure the joint is not locked or over-constrained.
Examples
- Rotate a duct joint: Use the command to flip a duct joint 180 degrees, moving features like clean out doors to the opposite side.
- Invert a mechanical linkage: Quickly change the direction of a joint for design corrections or layout changes.
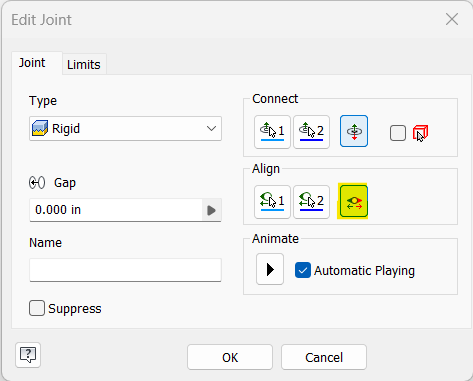
On the Inventor Edit Joint dialog box, this is equivalent to picking the Invert Alignment toggle button under "Align" - highlighted above.
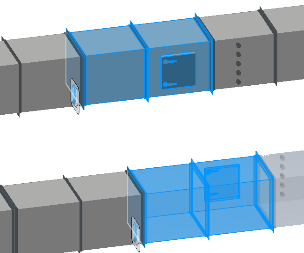
In this snip, the duct with the clean out door is selected and the left joint is picked. The result is the joint (and duct) is rotated 180 degrees and the clean out door is now on the back side of the duct. Note the adjacent duct fitting to the right with test ports is also rotated because its joint with the rotated fitting is not modified.